Setting up Hangfire in Umbraco 9
I'm a big fan of Hangfire to manage my scheduled tasks. I've previously written on how to get Hangfire up and running in Umbraco 8 and the good news is that it's even easier in Umbraco 9!
As a summary, we need to do 5 things:
- Install Hangfire
- Configure the Hangfire server and dashboad
- Secure the dashboard so that it's not publicly available
- Get the dashboard in Umbraco
- Schedule a job
Installing
This step hasn't changed at all, from your Visual Studio/Rider/CLI you add the NuGet packages to your project, to follow this blog post you'll require: Hanfire.Core, Hangfire.AspNetCore and Hangfire.SqlServer. At the time of this writing these were all at version 1.7.25. For the authorization to work you need to be at least at version 1.7.8.
Configuring
When you start playing with Umbraco 9 you will learn that the Startup.cs class is where all the magic happens. This is the starting point for all .NET Core apps and most tutorials and documentation will encourage you to alter that file. This is fine, but the downside is that if you ever want to redistribute some of your code as a package, you need to tell people to manually update the Startup.cs file after installing your package. Instead, wouldn't it be nice if everything was just automatically configured after installing a new package?
Good news: that's where Umbraco's Composers come in handy. We can separate all the setup code we need for Hangfire into a composer that will run at startup.
This bit of code is a little large to put in a blog post so I'll ad some screenshots of the different parts and I'll link to the source code for copy/paste purposes.
In the first part we need to tell Hangfire what database to use, in this example the same database as where Umbraco is installed is being used, so we're getting the connection string with the name "umbracoDbDSN".
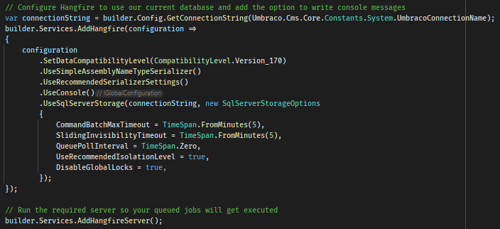
We're also telling the .net core app to add the Hangfire server, this will enable you to run jobs, otherwise it would only just queue them until a server becomes available.
Securing
In the next part the Hangfire dashboard is being added and authorized.
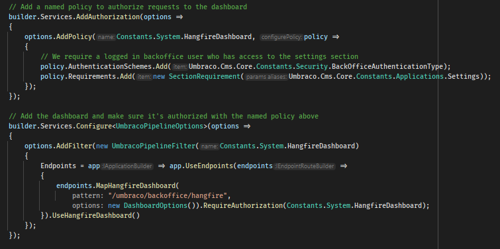
First we add a policy, named "HangfireDashboard" (it's in a constant, but trust me about the name 😉).
This will require people who visit the dashboard to be authenticated in the Umbraco backoffice and to have access to the Settings section of Umbraco. Luckily, Hangfire supports .net core authorization out of the box so all we need to do is to ask for RequireAuthorization with a name of a policy.
Do note that the endpoint URL here starts with /umbraco. I believe this is required if you require the user to be logged into the backoffice. Trying to do the same with just the default route (/hangfire) didn't seem to work.
Dashboard in Umbraco
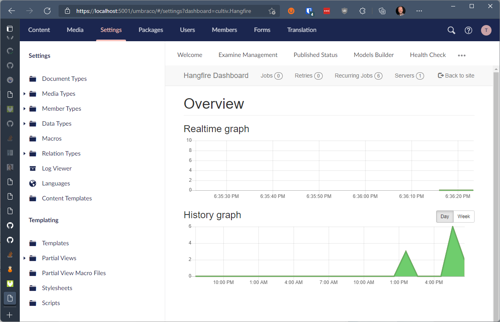
To get the dashboard to show up in Umbraco, we can make a little App_Plugin that contains a dashboard, the dashboard shows an iframe with the URL we configured above /umbraco/backoffice/hangfire. We should see something like this in our backoffice now:
This covered in more detail in the v8 blog post.
Run jobs
Finally, it's time to add some jobs to the list that can be ran! There was one last "gotcha" there that I've not seen before, I was getting an error that JobStorage.Current wasn't initialized yet. Maybe it's because I'm trying to add my jobs too early in the pipeline or maybe I'm doing something else wrong, not sure. Luckily it was easily solved by giving it a connection string, everything started working after that:

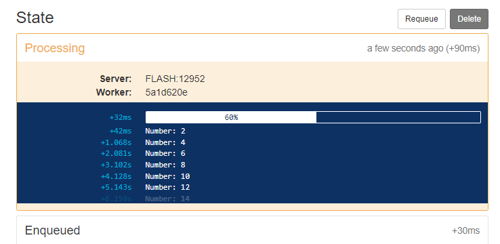
Then I wrote a silly little job to test it all out.
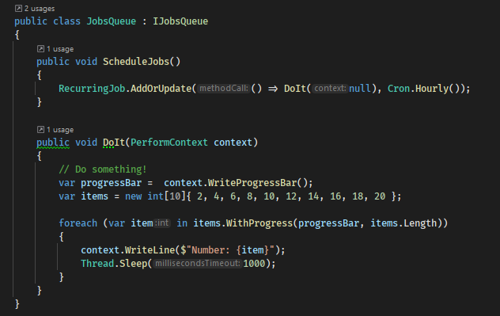
Which resulted in a beautiful overview with a progress bar that updated every second.
And there you have it, Hangfire fully working and fully protected in Umbraco 9. Happy queuing everyone!
Update: This is now available as a package as well: https://our.umbraco.com/packages/developer-tools/cultivhangfire/
The source code is available on GitHub: https://github.com/nul800sebastiaan/Cultiv.Hangfire
Packaging it up
This was also my first time producing a package for v9, which was made easier with the dotnet new umbracopackage command, after which I added a few bits to my csproj file, these were:
- the title
- description
- authors
- project URL
- license file
- icon
When I was trying to install this on a Cloud site, I realized my package dependencies for Umbraco wouldn't work. They were set to 9.0.0-rc003 but the current versions on Cloud are all nightly releases, named something like 9.0.0-preview1234.
Since P comes before R in the alphabet, NuGet refused to install the package. This was fixed by lowering the dependency in the csproj file to 9.0.0-preview001.
To wrap it up, I wanted to try out GitHub Actions to build and deploy the package automatically. A blog post by Andrew Craven came in handy there and with a few little changes I was able to add build scripts and release deploy scripts.
So now when I add a tag to a commit in my GitHub repository, a build will run and when successful, package everything up and push it as a new release to NuGet. You can check out the automation files I ended up creating on GitHub if you need some inspiration.