How I run this very website on a Raspberry Pi in my closet at home
I've been doing this Umbraco thing for a while now, my first post on this blog is from 2009 (about custom user controls, yikes).
In my wildest dreams I wouldn't have thought that I'd be running this blog on a tiny computer in the closet of my home office, but here we are!
Umbraco has come a long way ever since we were finally able to switch to dotnet ("core") as the underlying software, instead of .NET framework. Suddenly the CMS turned into software that could run on all kinds of architectures, not just Windows. Even so, there were a few interesting hurdles to overcome in the beginning, which I blogged about 2 years ago. The biggest problems were the difficulty of getting dotnet installed and hosting a database server on the Pi. Through evolutionary changes, the obstacles have mostly gone away. Ubuntu ships with the ability to install dotnet directly from it's own "app store" and Umbraco has a SQLite database provider now which means we don't need to have a heavy, full SQL Server installed any more.
So running an Umbraco site on a Raspberry Pi, really is not a bit problem any more. But what should we do with it? It's cool that it can run as server for maybe a dashboard at home or at work, but the use cases are quite limited. Umbraco is made for publishing things on the web! Sure we could run something like ngrok but that is meant for testing, not as a permanent solution to run a full website.
Luckily, one other significant thing happened in the past few years, Cloudflare has a product called Cloudflare Tunnels, a completely free way to bind your domain name to (in my case) a tiny little server in the closet. Cloudflare Tunnels emerged from older offerings they had and their blog post announcing it last year was right on the point with it's title: Ridiculously easy to use Tunnels. More on this later!
I have been testing running this site on the Pi for the last two months and finally switched it over to the live domain, cultiv.nl this week. I wanted to make sure everything was stable and that I could survive random reboots. My partner and I moved into a new apartment recently and there's been significant renovations, so I've switched the power off quite a lot. Yet, everything has been super stable!
Stop yapping, Seb, show me how
So with all this wonderful new tech, let me tell you how I've put it all together.
The abbreviated steps are:
- Flash Ubuntu server on a Raspberry Pi memory card
- Install .NET 7 on the Pi
- Publish a website with dotnet and copy it to the Pi
- Run the website as a service, so it survives reboots
- Add Cloudflare Tunnels to host the website on my own domain
Flashing
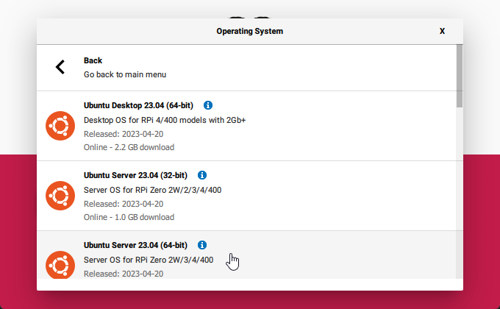
You can download the Raspberry Pi imager from their website and run it with a guided wizard. I chose to install "Other general purpose OS" ➡️ Ubuntu ➡️Ubuntu server 23.04 64 bit.
I also made sure to go into the advanced settings and set up a hostname (in my case: cultiv1.local), and a username and a password. Even though I have an ethernet connection I also pre-configured my wifi in the advanced settings just in case I accidently unplug the cable.
Installing .NET 7
Once the Pi has booted I can connect to it from Windows Terminal (this works in cmd.exe as well, but I love WT). What you do need to make sure to have installed is: ssh and scp. Type both these commands and then enter to see if you have them. I can't tell you where they came from, they seem to have pre-installed on my Windows 11, your mileage may vary 😅
Alright, with that intro out of the way, I can connect to my Pi. My username is 'sebastiaan' so I'll send that in to make the connection easy:
ssh sebastiaan@cultiv1.local
I get prompted for my password next and then I'm in.
For good measure, I want to make sure my Pi is completely updated with all the latest software so I run two commands to go through all of it.
sudo apt update
sudo apt full-upgrade
Finally after following all the prompts on the screen I reboot.
sudo reboot
None of that is absolutely necessary but I like to be up to date.
Now I can install .NET 7 as guided by Microsoft.
sudo apt-get update && \
  sudo apt-get install -y dotnet-sdk-7.0
sudo apt-get update && \
  sudo apt-get install -y aspnetcore-runtime-7.0
sudo apt-get install -y dotnet-runtime-7.0
And that should do the trick!
Publish site and copy it to the Pi
To test this all out, I move back to my local Windows machine where I have set up a test website using Paul Seal's brilliant Package Script Writer.
If I go into that website I can publish it with the command:
dotnet publish -c Release -o .\release
This publishes the website with the Release configuration and in a directory called "release" in the current directory.
I navigate into the release directory through Windows Explorer and make a single zip file of everything in there. This is to help with copying everything over. I tried copying all the individual files over and it takes forever with all the thousands of little files Umbraco has. Copying a single zip is, well, pretty zippy.
Now I can copy the zip over to the Pi. In order to do so I switch back to my ssh session on the Pi and make a new directory in my home directory called "testlive". Then I can do the copy from Windows using scp:
scp release.zip sebastiaan@cultiv1.local:/home/sebastiaan/testlive/release.zip
On the Pi, I need to do a one-time install of a package called unzip, you can guess what we're needing that for 😉
sudo apt-get install unzip
After that is done we can go to the directory on the Pi where release.zip was copied, extract all the files and delete release.zip:
unzip release.zip
rm release.zip
I made sure to test that the site runs. My project was called "MyProject" so in the release directory there's a MyProject.dll, which is the main entry point for the app. In order to run the site, I ran:
dotnet MyProject.dll
This will give absolutely no output on the command line, so I opened a second ssh session into the Pi and tried to make sure something was running. By default, the site runs on port 5000 so I can see if there's a response using curl:
curl http://localhost:5000
This resulted in a bunch of HTML flashing on the screen. Excellent.
Run the website as a service
Now that I've confirmed the site can run, I tap CTRL+C on the first ssh session to stop it from running. I want to make sure the site starts every time the Pi reboots, so I followed the thorough guide by Niels Swimberghe to do so.
I created a new text file called MyProject.service using nano (a text editor for Linux):
nano MyProject.service
The content of the file is as follows, I'll explain below what you would want to change:
[Unit]
Description=ASP.NET Core web template

[Service]
# will set the Current Working Directory (CWD)
WorkingDirectory=/home/sebastiaan/testlive
# systemd will run this executable to start the service
# if /usr/bin/dotnet doesn't work, use `which dotnet` to find correct dotnet executable path
ExecStart=/usr/bin/dotnet /home/sebastiaan/testlive/MyProject.dll --urls "http://*:5001"
# to query logs using journalctl, set a logical name here
SyslogIdentifier=MyProject

# Use your username to keep things simple, for production scenario's I recommend a dedicated user/group.
# If you pick a different user, make sure dotnet and all permissions are set correctly to run the app.
# To update permissions, use 'chown yourusername -R /srv/AspNetSite' to take ownership of the folder and files,
#       Use 'chmod +x /srv/AspNetSite/AspNetSite' to allow execution of the executable file.
User=sebastiaan

# ensure the service restarts after crashing
Restart=always
# amount of time to wait before restarting the service
RestartSec=5

# copied from dotnet documentation at
# https://docs.microsoft.com/en-us/aspnet/core/host-and-deploy/linux-nginx
KillSignal=SIGINT
Environment=ASPNETCORE_ENVIRONMENT=Production
Environment=DOTNET_PRINT_TELEMETRY_MESSAGE=false

[Install]
WantedBy=multi-user.target
I changed the WorkingDirectory to where my published site is located, then the arguments on ExecStart specify that location again plus the name of my dll. You'll note that I added a --urls option there, this is to change the default port number from 5000 to 5001. Knowing that this works, I can run multiple sites on this Pi 💡
Finally, I changed the SyslogIdentifier and the User to be my username.
Now I can copy this service definition to where Linux expects it, start my service and enable it to auto run:
sudo cp MyProject.service /etc/systemd/system/MyProject.service
sudo systemctl daemon-reload && sudo systemctl start MyProject
sudo systemctl enable MyProject
I figured I should probably do another "curl" command to see if it works, and if it doesn't then I can look at Niels' guide again to figure out with journalctl what's being logged as going wrong. In my case, all was well 🎉
Add Cloudflare Tunnels
Okay, the last piece of the puzzle! As a caveat, my DNS is already being managed by Cloudflare and it is a requirement that yours is as well in order to follow the last few steps. Wherever you registered your domain name, it should allow you to not use the DNS services of the registrar but Cloudflare's DNS servers instead. I used Namecheap (and I don't like them but they indeed have cheap domains and they have a lot of TLDs that I would like to use) I configured them as follows:
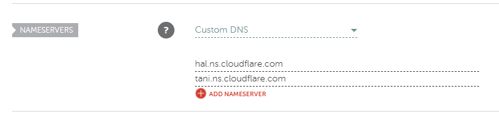
Cloudflare will help you to some extend when you add a new domain there, use their guidance to configure your own.
On Cloudflare's Zero Trust dashboard at https://one.dash.cloudflare.com/ I can go to Access ➡️ Tunnels and tap on "Create Tunnel". There I choose to get the commands for Debian (Ubuntu is a Debian variant) on arm64 (the architecture of the Pi). After executing the 3 commands (which will install a service called "cloudflared", starts the services and makes a tunnel connection), you can tap "Next" to select your public hostname.
As I noted, your hostname should be known to Cloudflare already, otherwise it won't appear in the domain name dropdown.
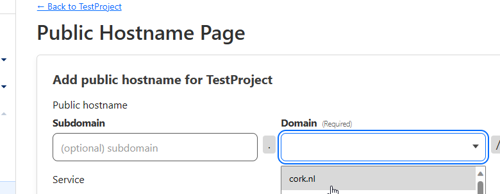
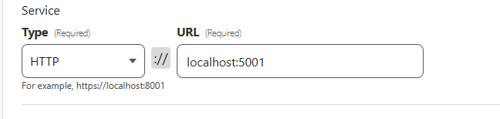
After selecting my domain I can now tell it about my site on the Pi, which is at http://localhost:5001.
Cloudflare Tunnels will now set up a CNAME for you and will tunnel all the traffic to that domain name straight to your Raspberry Pi. Magic 🪄
Note that I didn't need to open any ports or tell my router anything. The Cloudflare Tunnel software coordinates the traffic transparently for you.
Conclusion
And there we have it, suddenly my site is running on a little board, literally in my closet.
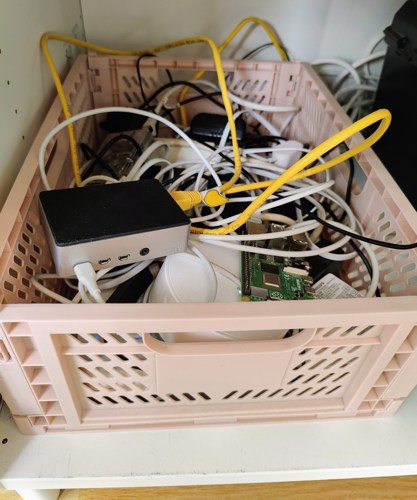
It's the green one you can see above, entangled in the rest of my home automation jumble.
All of this seems like pure magic but is possible thanks to recent advancements in tech.
I would absolutely love to know if you tried this out yourself and how you're getting on. You can find me mostly on Mastodon but there's other places if you are not on that yet. Check https://cultiv.dev/ for the latest ways to find me online.