Running Umbraco sites in Docker, still on a Raspberry Pi in my closet at home
The slight downside of hosting your websites in your closet at home is that you need 2 things to keep working: the internet and the power.
Unfortunately, a few weeks ago I lost power at home for a few hours. When the power was finally fixed, it turns out that this outage had fried the Raspberry Pi containing this blog, ouch 🤕 The whole thing just stopped booting altogether, I spent a good 8 hours that weekend trying everything the internet would tell me, but with no luck. RIP Pi 🪦
This was an older Raspberry Pi 4 and while I ordered a new Pi 5 immediately to replace it, I was dreading remembering how to set the whole thing up again and deploying to it, etc.
So I did the only thing proper techie would do: sink hours and hours into learning how to make my deploys easier. I knew from the beginning the answer would probably be Docker, but I didn't know how much happier it would make me (spoiler alert: a LOT happier!).
Learning Docker
I didn't know much about Docker, something about it not being VMs, but still kind of VMs. I was always a bit curious but when I tried to read about it, my eyes always glazed over.
I stumbled upon Scott Hanselman's NDC Sydney talk about Docker and, knowing Hanselman, I knew I'd at least be entertained. Let me tell you: it was an eye opener. Scott has a knack for making difficult topics very accessible.
This is not a post to teach you Docker, I will encourage you watching Scott's talk and I also learned a lot from this Docker tutorial for beginners.
Turning a completely clean Umbraco website into a Docker container
Okay, I understood the basics: I needed to take my app, add a Dockerfile and build and run that with Docker.
I also needed a way to isolate some of the files that Umbraco uses, like the media folder, logs and the database (I use SQLite to make it easy on myself). This isolation is necessary because each time a docker container stops, any changed files will just revert to their initial state; the state they were in when the container was built.
Of course reverting a database to a previous state is not very productive once you've added content items (etc.) in them. Don't want to keep writing that content on each restart!
In the past few months, my colleagues in the CMS team had added a Dockerfile to the default dotnet new template if you asked for it, so adding --add-docker to the dotnet new umbraco command would give you a sample file. I love Paul Seal's Package Script Writer site so I generated the script I needed to start an empty site from there.
Time to start a docker build . - or so I thought. Sadly I was wrong. My inexperience made it difficult for me to understand what was going on in this Dockerfile and I immediately ran into some errors because expected paths were just wrong. Long story short, during Umbraco Spark this year I got some much needed help from Andy Felton and Carl Sargunar.
As it turns out, the Dockerfile works pretty well if you have a project with a .sln file and a certain file structure, but I don't really bother for most things I'm building, I'm happy to have just a single csproj file and build around that, so adjustments were needed to paths.
Once I made the adjustments, I was ready to go! My adjusted Dockerfile can be inspected on GitHub where the source of this site now lives as an open source project.
If you compare the changes, (which took me hours of fiddling plus help from two lovely humans!), they don't look impressive enough to be honest:
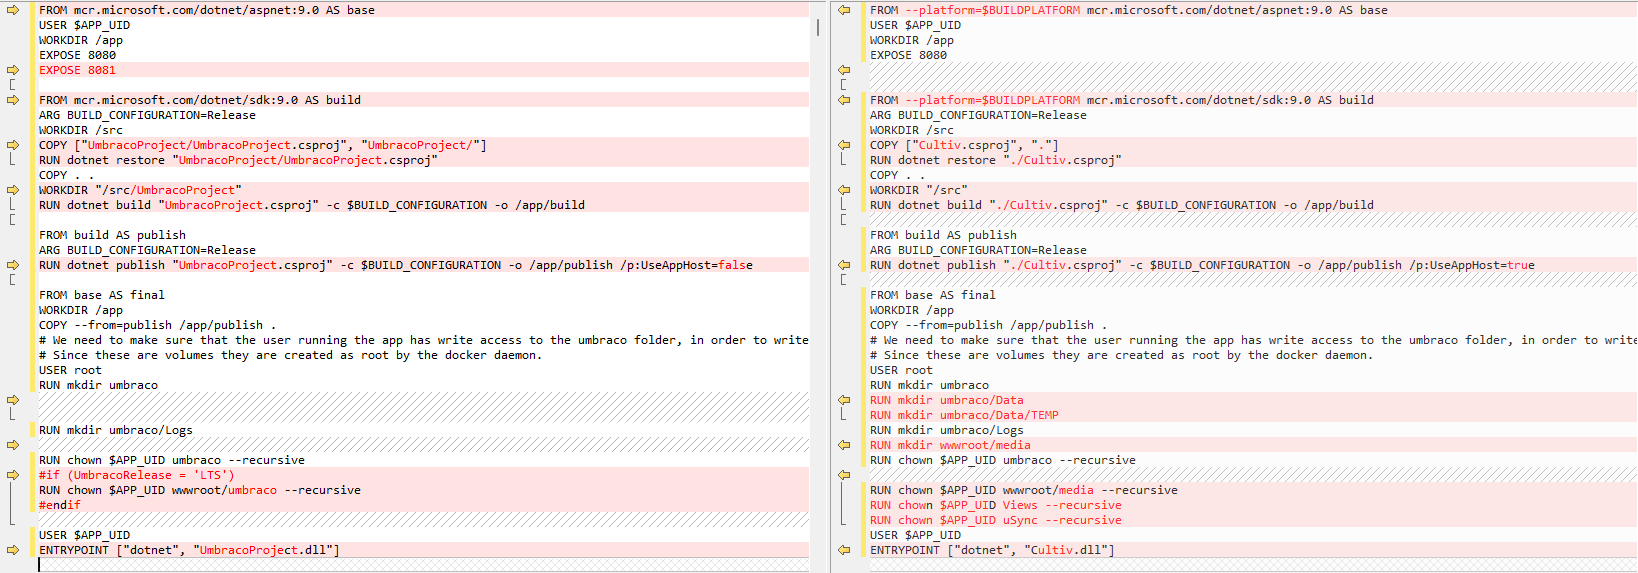
(tap to enlarge)
The most important changes were needed in the paths in the first half of the file.
Anyway, I was on my way to success! Maybe.
Dockerizing an existing Umbraco site
Adding a Dockerfile now is not that different from a clean site. The few things to consider now are to restore the existing data somehow (a container is basically empty with no database), and adding media files back.
To make sure that the database and media files get preserved through docker restarts, I needed to use the concept of Docker volumes. A volume is a mapping from a file or folder inside the docker container to a file or folder on the local disk (the local machine that is the Docker host).
So to make it clear:
- we start a Docker container
- it looks for the SQLite database file inside the container,
- the file exists on our local disk instead
- by adding a volume, we tell the container where the file exists
To tell Docker about this, when I first start the container, I add arguments to the command, the volume argument looks like: -v cultiv-live-data:/app/umbraco/Data. This says: create a volume for the ~/Umbraco/Data directory. In order to figure out where the cultiv-live-data volume lives on the local disk, I can ask Docker with the command: docker inspect <container-name>.
For example, when I ask for running containers using docker ps, I learn that my container is named relaxed_heisenberg:
![]()
(tap to enlarge)
I can then inspect it:
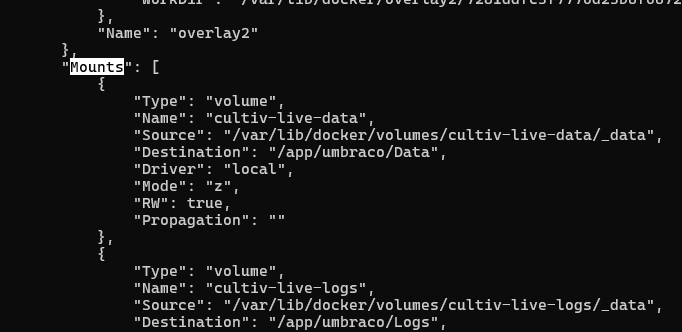
From this I learn where the actual files are stored locally: /var/lib/docker/volumes/cultiv-live-data/_data.
As it turns out, copying an existing SQLite database into this location won't actually work, the permissions are read-only on this file. That's easily fixed with a chmod 777 /var/lib/docker/volumes/cultiv-live-data/_data/Umbraco.db command. I say easily, that took me an extra half Saturday... 😅
As a workaround, I actually just didn't copy the database file and instead used uSync to just recreate the whole site. I also made sure to specify an unattended install in appsettings.json so I could log in and do the uSync restore.
Testing builds
To test the container builds, I had the full dotnet project locally and for each change I had to do a build and run the container. Just to show you the complete command in the directory where the Dockerfile is:
docker run \
    -d \
    -p 8080:8080 \
    -v cultiv-live-data:/app/umbraco/Data \
    -v cultiv-live-logs:/app/umbraco/Logs \
    -v cultiv-live-media:/app/wwwroot/media \
    $(docker build -q .)
To break this down:
-dis to make sure that the container is running detached (I get my command line back, it runs in the background)-p 8080:8080says map the local port 8080 to the 8080 port inside the container, I made sure in my appsetting.json that Kestrel would always start on port 8080.- Note: you'll see it starts on
http://0.0.0.0:8080, this was a tip I got from the forum
- Note: you'll see it starts on
-vare the volumes I talked about earlier$(docker build -q .)is a nice cheat, what will happen is that this command runs first and then outputs the image identifier, which is whatdocker runuses to run it- Alternatively, I could have done a
docker build .first, wait for the id to be shown and then do adocker run ba5773fd56772499ea1c41bbe39bac4ca0dcd279db639d089dea45781e1769d9(for example)
- Alternatively, I could have done a
Once everything was building and actually starting on Windows, I could test the same on my Raspberry Pi, but this felt like friction since I needed all of the source code to be on the Pi. I got it to work but surely there was a better way?
Making deploys and updates easier
Of course there was a way. It's called a Container Registry (think "NuGet" or "NPM" for containers). I learned that GitHub has a container registry built-in and that I could use a GitHub Workflow Action to publish my source code as a container.
The sample YML file that I found worked almost completely out of the box, I had to add some permissions and I was up and running. So whenever I push a change to my main branch now, it will build a new container for me, which I can pull to any machine. Magic!
So the above command changed to:
docker run \
    -d \
    -p 8080:8080 \
    -v cultiv-live-data:/app/umbraco/Data \
    -v cultiv-live-logs:/app/umbraco/Logs \
    -v cultiv-live-media:/app/wwwroot/media \
    ghcr.io/nul800sebastiaan/site
This worked great on Windows, but unfortunately failed completely on the Raspberry Pi as the Pi uses an ARM processor, and the container that I built only works on non-ARM processors. I had to make 2 changes to the workflow: run the build on ubuntu ARM and tell the docker build to use the ARM platform. This took quite a bit of trial and error, the resulting workflow file is open on Github. Together with that change I also needed to change the Dockerfile to specify that I want the ARM versions of ASP.NET and the .NET SDK. This can be done by specifying --platform=$BUILDPLATFORM when importing those two.
And there we have it, after a month (on and off) of tinkering the evenings and weekends, the result is just 3 little files:
- Dockerfile
- publish-container.yml
- .dockerignore (I've not mentioned this one previously, the default file "just" worked)
Running the command above starts the site on port 8080, volumes preserve important files (logs, media, database) so I can drop in a new container at any time and know that my data will still be there. I still love and use Cloudflare Tunnels to give that local site a public URL.
Note: I am cheap, so I wanted to avoid GitHub charging me for using it's container repository. It's only free for public repositories, so that forced me to make the code for my site public. More on this later...
Let's do it again!
Now that I had one site running from a container (this blog!), could I easily do it again? Yes, was the answer. With a little tweaking I had the second site, UmbraCalendar, up and running as well. However, I couldn't make that open source so easily, because this site contained secrets 🙈
Dealing with secrets
I wasn't quite sure how to approach this problem. I played with environment variables to put secrets in and nothing felt quite right.
I thought that Docker volumes could only map directories, but it turns out they can also map single files, which is convenient because what I really wanted was just to have a appsetting.Production.json that was not in my GitHub repo. The problem is: appsettings.Production.json is a file in the root of my website. Of course could make a volume to map to the root of my site, but that doesn't work, nothing lives in the container any more and then it's pointless to have a swappable container, I'd have to manually copy in new dlls on each deploy (for example).
In the end, it was quite a bit simpler than I imagined it would be! You can indeed map a single file to a volume as well, so my command to run UmbraCalendar looks like this:
docker run \
    -d \
    -p 8085:8085 \
    -e ASPNETCORE_ENVIRONMENT='Production' \
    -v umbracalendar-live-data:/app/umbraco/Data \
    -v umbracalendar-live-logs:/app/umbraco/Logs \
    -v umbracalendar-live-media:/app/wwwroot/media \
    -v $(pwd)/Hangfire.db:/app/Hangfire.db  \
    -v $(pwd)/appsettings.Production.json:/app/appsettings.Production.json \
    ghcr.io/nul800sebastiaan/umbracalendar.site:latest
I am passing an environment variable to tell .NET that this is my Production site and that means it will load the appsettings.Production.json, the file with all my secrets in it. I need to copy that file to the server once, to get my secrets there but that's it.
You might also note that I am using SQLite for Hangfire, which puts a Hangfire.db in the root of the site and that one is mapped the same way.
The setup for this site is otherwise identical to my blog, 3 files which can be found in the GitHub repo and that's it.
Moving around
I had this up an running on one Raspberry Pi but I wanted to make it a little faster to run, so I ordered an SSD for the Pi, which makes it a bit nicer than running from an SD card. I hear SD cards are often the biggest source of failure on a Pi, though none of mine ever got corrupted (knock on wood).
When the SSD arrived, I mounted it on my other Pi and then:
- installed a completely blank Ubuntu
- installed all the OS updates
- installed docker
- ran the above commands
- moved database and media files for both sites over
- switched the Cloudflare Tunnels to use this other Pi instead
And that's it, I was done. All of that took only 15 minutes!
Future improvements
I know I don't need to run those long docker run commands and I plan to use a docker-compose.yml file instead. Docker compose is basically just a config file for all those command line parameters that will make it easier for me to start a container and I don't have to write down these exact commands to use later.
Conclusion
When I started this investigation I thought it would be a minor improvement to my life but really when I started understanding how Docker weaves things together it was a lot more impressive than I thought it would be. I've since gone on a little adventure trying to run all sorts of pre-built Docker containers to make my life easier (hello Pi-Hole 👋) and I definitely intend to learn more in the near future.
Most of all, I now have a super smooth way to deploy my Umbraco sites to my Pi and have been able to consolidate two separate Pi's into one since I don't have to worry about fiddling with making sure the correct prerequisites are installed (I had a conflict between 2 different .NET SDK versions before). I'm impressed and very happy!